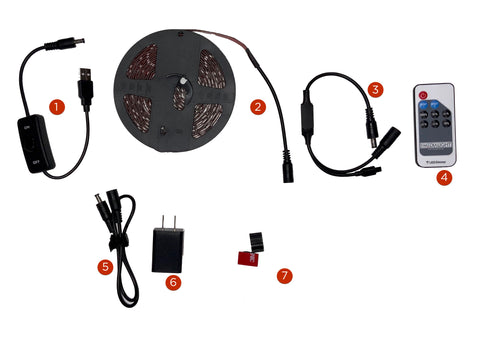
If your MediaLight Mk2 box shows "v2" in the top right corner, click here for updated installation instructions!
Please only install one dimmer per MediaLight or LX1. If you are adding a Wi-Fi dimmer to your Mk2 Flex, don't also use the other dimmer that came with the Mk2 Flex. They won't work properly until one is removed.
Most MediaLight strips are rated for 5v power (except those specifically made for 24v power — if you ordered from a MediaLight dealer, you almost definitely ordered 5v strips). Do not attempt to power with anything other than USB power. If you need brighter strips (you shouldn’t need it brighter for bias lighting applications), please use our specially-made 24v strips.

The pure copper strips in your MediaLight Mk2 are excellent conductors of heat and electricity, but they are also very soft and can tear very easily.
Please leave the corners slightly loose and don't press them down. The corners may even stick up a bit. This is normal and there is no risk of detaching. It will not cause any shadows. Compressing the corners can cause them, on occasion, to tear.
If your MediaLight is attached to the TV, there is an excellent chance that it will tear if you try to remove it. The glue forms a very high bond. This is covered under warranty.
⚠️ Reduce the risk of damage to your new MediaLight.*
Please read this installation guide and watch the short installation video for many years of enjoyment.
*Of course, if your MediaLight ever breaks during installation it is covered under the MediaLight 5-Year Warranty.
The red circles in the photo above show the FLEX POINTS where you can safely bend the strip 90° in either direction. Either flex point can bend in either direction. There is no need to mash the corners down. (Depending on the amount of force used to compress the corners, you can tear the copper PCB strip).
If you need to make more than a 90° turn, you should plan the turn over several flex points. In other words, a 180° turn should be distributed between two 90° turns.
There is no need to flatten the corners down when you turn a corner, but if you cannot resist the urge, just don't press too hard.
Ok, with that out of the way, please view our installation video!
Having problems with your dimmer remote control? Be sure to watch this hastily-made video to show you how to ensure proper line of site.
Additional nitpicky details:
If this is information overload for you, feel free to skip it, but if you are wondering why we made certain design decisions, you’ll probably find the information below.
The MediaLight Mk2 looks very different from our previous models. It has been completely redesigned. Before we get into installation, I want to outline the changes and explain why we made them.
First, you'll notice that the strip uses a zigzag pattern. This was done because, instead of older units that relied on multiple strips all connected to the same 4-way splitter, we've optimized the strip to run as a single piece around 3 or 4 sides, or in an inverted-U on the back of the display.
Unlike the older MediaLight Flex, there is no trick to turning corners. The strip will easily turn corners, just be sure to not crack the fragile components on the strip. Only bend where there is a FLEX POINT marked with the MediaLight "M" logo or "DC5V".

1) The Mk2 units only include a .5m (half meter) extension cord. That's pretty short, right? We did this to be stingy -- but NOT with money.
This is what they look like before they are immersed and cut and before the LEDs and resistors are soldered on:


When installing the new MediaLight Mk2 on your display, if you are going around 3 or 4 sides, for example, when your display is on a wall mount:
Your lights are covered under the industry-leading warranty for 5 years and we cover botched installations, so don't stress too much. If you make a mess of the MediaLight Mk2, just contact us.


Jason Rosenfeld
MediaLight


